
Sep . 23, 2024 05:12 Back to list
best diy gabion wall
Best DIY Gabion Wall A Creative Outdoor Project
If you’re looking to enhance your outdoor space, a gabion wall can be an excellent choice. Not only does it add a unique aesthetic appeal, but it is also a sustainable and durable solution for landscaping and garden design. Constructing a DIY gabion wall can be a rewarding project that requires minimal materials and effort, making it perfect for both seasoned DIY enthusiasts and beginners alike.
What is a Gabion Wall?
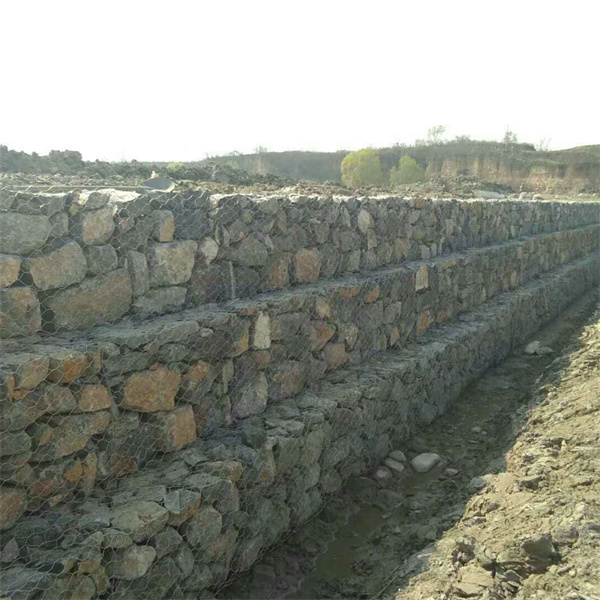
A gabion wall is constructed using wire mesh cages filled with rocks or stones. Originally used for erosion control and as a barrier in civil engineering, these walls have gained popularity in landscaping due to their rustic charm and versatility. They can be used as retaining walls, decorative features, or even seating areas in your garden.
Materials Needed
To build your own gabion wall, you'll need a few basic materials
1. Wire Mesh This is the backbone of your gabion wall. It can be bought in rolls at any hardware store. Make sure to choose a heavy-gauge wire that can withstand the weight of the stones. 2. Rocks or Stones Select rocks that complement your landscape. This could be river stones, granite boulders, or reclaimed materials. Keep in mind that varied sizes and shapes will add more character to your wall. 3. Wire Cutters You'll need these to cut your wire mesh to the desired dimensions. 4. Gloves To protect your hands while handling wire and rocks.
5. Optional Materials You may also want to use landscape fabric to prevent soil erosion behind the wall, as well as leveling materials like gravel.
Steps to Create Your Gabion Wall
best diy gabion wall
1. Planning and Design Decide where you’d like the wall to go, and sketch a rough design. Determine the height, width, and length of the wall.
2. Prepare the Ground Clear the area where the wall will be built. Ensure the ground is level and stable.
3. Construct the Wire Frames Cut the wire mesh into the shapes you want. Typically, rectangular or square frames work well. Secure the corners and edges with additional wire twists to form solid cages.
4. Filling the Cages Start filling the cage with rocks. Aim for a mix of larger and smaller stones to fill gaps. You might want to shake the cage gently as you fill it to settle the stones.
5. Securing the Fill After filling a cage, you can close it securely using the remaining wire. Repeat the process for additional cages if you’re building a multi-tier wall.
6. Finishing Touches Position your gabion wall in place and ensure it’s stable. Add any additional decor elements like plants or lighting to enhance its appeal.
Benefits of a Gabion Wall
Gabion walls are not only visually appealing but also serve functional purposes. They allow for proper drainage, control erosion, and provide a sturdy structure that can last for years with minimal maintenance. Additionally, they offer a unique opportunity for creativity, allowing you to choose from a variety of materials and designs.
In conclusion, building a DIY gabion wall is an exciting project that can transform your outdoor space while being environmentally friendly. Gather your materials, embrace your creativity, and enjoy the rewarding experience of crafting your very own gabion wall!
-
Versatility of Chain Link Fence Gabion
NewsMay.13,2025
-
Trusted Gabion Box Suppliers
NewsMay.13,2025
-
PVC Coated Gabion for Long-Lasting Structural Integrity
NewsMay.13,2025
-
Garden Gabion for Stylish
NewsMay.13,2025
-
Galvanized Gabion for Durable Outdoor Structures
NewsMay.13,2025
-
Gabion Box Factory
NewsMay.13,2025
-
Gabion Basket Wire Gauge and Mesh
NewsMay.13,2025
-
 Gabion Mattresses serves as a retaining wall, providing various prevention and protection works such as landslide prevention, erosion and scour protection as well as various type of hydraulic and coastal protection for river, sea and channel protection. This Gabion Mattress System is made up of a specially designed composite in order to maximize its performance through three phases of vegetative process from unvegetated to vegetation establishment up to vegetation maturation.
 -
 The hesco barriers is a modern gabion primarily used for flood control and military fortifications. It is made of a collapsible wire mesh container and heavy duty fabric liner, and used as a temporary to semi-permanent levee or blast wall against explosions or small-arms. It has seen considerable use in Iraq and Afghanistan.
 -
 3D Triangle bending fence panels an economical version of the panel system,
constructed from a Welded Wire Fence with longitudinal profiles that forms a rigid fence.Due to its simple structure ,easy installation and nice appearance,more and more customers regard this product as the preferred common protective fence. -
 A chain link fence is a type of woven fence usually made from galvanized or PE-coated steel wire.Chain link fence is a kind of elastic woven net, the net hole is even, the net surface is smooth, the net is simple, beautiful and generous, the net silk is high quality, not easy to corrode, the life is long, the practicability is strong.
 -
 Gabion basket also named gabion boxes, is weaved by corrosion resistance, high strength and good ductility galvanized wire or PVC coating wire through mechanical. Wire's material is zinc-5% aluminum alloy (galfan), low carbon steel, stainless steel or iron.
 -
 The gabion basket is made of twisted hexagonal woven mesh. The metal wire used to make gabion baskets is made of soft tensile heavy galvanized steel, and PVC coating can also be used for additional corrosion protection when the application requires.