
Nov . 19, 2024 21:52 Back to list
gabion cages diy manufacturer
DIY Gabion Cages A Comprehensive Guide for Enthusiasts
Gabion cages have become increasingly popular in landscaping and construction due to their versatility and durability. They are often used for erosion control, decorative features, and as structural support in various projects. If you're considering incorporating gabion cages into your endeavors, understanding their manufacturing and assembly process can be highly beneficial. This article provides a comprehensive guide to DIY gabion cages, highlighting the materials needed, steps to create them, and their numerous applications.
What are Gabion Cages?
Gabion cages are wire mesh containers filled with stones, gravel, or other materials. They can be used in different sizes and shapes, depending on your project's requirements. These cages are not just functional; they also add an aesthetic appeal to outdoor spaces. The textured appearance of the stones contrasts beautifully with greenery, making them an excellent choice for gardens, patios, and retaining walls.
Materials Needed
To create your own gabion cages, you’ll need a few essential materials 1. Wire Mesh Heavy-gauge galvanized wire mesh is recommended for durability. The mesh should have small openings to hold the stones securely. 2. Wire Ties These help secure the mesh together at the joints and edges. 3. Stones or Gravel Choose materials based on your design; larger stones provide stability, while smaller gravel can fill gaps. 4. Tools You'll need standard tools such as wire cutters, pliers, and gloves for safety during assembly.
Steps to Create Gabion Cages
1. Design Your Cage Determine the size and shape of your gabion cage. Sketch a plan that includes dimensions and the areas you want to fill with stones.
2. Cut the Wire Mesh Use wire cutters to cut the galvanized wire mesh according to your desired measurements. Make sure to account for additional material needed to fold over the edges.
gabion cages diy manufacturer
3. Assemble the Frame Shape the cut wire mesh into a rectangular or cubic structure and use wire ties to connect the edges securely. Strengthening the corners is crucial for stability.
4. Fill with Stones Once the cage is secure, start filling it with your chosen stones or gravel. Packing the stones tightly not only enhances the strength of the cage but also provides a natural aesthetic.
5. Close the Cage After filling, fold the top edges of the wire mesh over the filled stones to secure them inside. Use additional wire ties for reinforcement.
6. Position Your Gabion Cage Finally, place your completed gabion cage in the desired location. They can be used as a garden bench, retaining wall, or decorative feature.
Applications of Gabion Cages
The uses for gabion cages are limitless. Here are some common applications - Erosion Control Gabions placed along riverbanks can prevent soil erosion and damage from flowing water. - Privacy Walls Tall gabion structures can create privacy screens while enhancing the visual appeal of a yard. - Landscaping Features Used as planters or decorative walls, they blend naturally into outdoor spaces. - Sustainable Construction Gabions are eco-friendly, as they utilize natural materials and can be filled with local stones.
Conclusion
DIY gabion cages offer an exciting opportunity for both practical applications and creative landscapes. Not only are they a sustainable option for various projects, but they also allow homeowners and enthusiasts to customize their designs. With the right materials and careful assembly, you can create stunning gabion cages that elevate your outdoor space while serving necessary functions. Dive into this rewarding project today and enjoy the beauty and efficiency of gabion structures in your surroundings!
-
Transform Your Outdoor Space with Gabion Fences
NewsApr.01,2025
-
The Versatility of Gabion Baskets for Your Projects
NewsApr.01,2025
-
The Importance of a Protective Net Sleeve for Your Valuable Investments
NewsApr.01,2025
-
The Benefits of Gabion Walls for Your Next Project
NewsApr.01,2025
-
Gabion Baskets
NewsApr.01,2025
-
Discover The Benefits of Protective Nets
NewsApr.01,2025
-
The Essential Guide to Gabion Supplies
NewsMar.12,2025
-
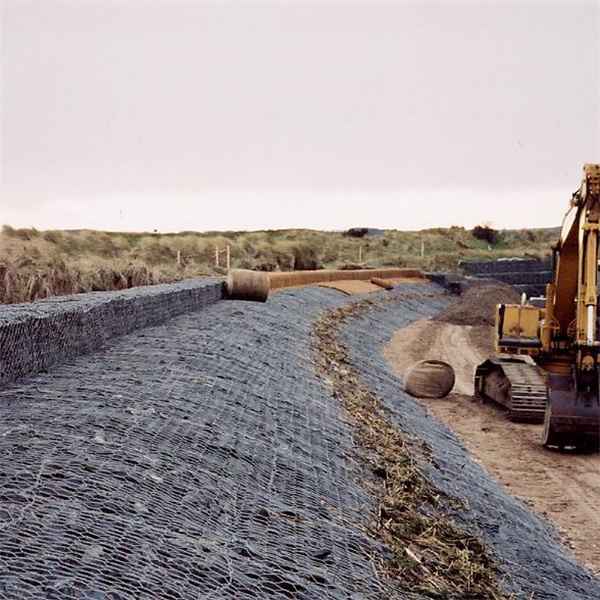
 Gabion Mattresses serves as a retaining wall, providing various prevention and protection works such as landslide prevention, erosion and scour protection as well as various type of hydraulic and coastal protection for river, sea and channel protection. This Gabion Mattress System is made up of a specially designed composite in order to maximize its performance through three phases of vegetative process from unvegetated to vegetation establishment up to vegetation maturation.
 -
 The hesco barriers is a modern gabion primarily used for flood control and military fortifications. It is made of a collapsible wire mesh container and heavy duty fabric liner, and used as a temporary to semi-permanent levee or blast wall against explosions or small-arms. It has seen considerable use in Iraq and Afghanistan.
 -
 3D Triangle bending fence panels an economical version of the panel system,
constructed from a Welded Wire Fence with longitudinal profiles that forms a rigid fence.Due to its simple structure ,easy installation and nice appearance,more and more customers regard this product as the preferred common protective fence. -
 A chain link fence is a type of woven fence usually made from galvanized or PE-coated steel wire.Chain link fence is a kind of elastic woven net, the net hole is even, the net surface is smooth, the net is simple, beautiful and generous, the net silk is high quality, not easy to corrode, the life is long, the practicability is strong.
 -
 Gabion basket also named gabion boxes, is weaved by corrosion resistance, high strength and good ductility galvanized wire or PVC coating wire through mechanical. Wire's material is zinc-5% aluminum alloy (galfan), low carbon steel, stainless steel or iron.
 -
 The gabion basket is made of twisted hexagonal woven mesh. The metal wire used to make gabion baskets is made of soft tensile heavy galvanized steel, and PVC coating can also be used for additional corrosion protection when the application requires.